What Is Reverse Searing Meat?
Reverse searing meat is a cooking technique that transforms the way we cook thick cuts of meat, from steaks to roasts, promising an evenly cooked, tender inside with a deliciously crisp crust. This method flips traditional cooking on its head, starting with a slow cook at a low temperature before finishing with a high-heat sear. So, what makes this technique stand out, and how can you master it at home? Let’s dive in.
🍳 The Science Behind Reverse Searing
The charm of reverse searing lies in its science. At its core, this method leverages the Maillard reaction—a chemical reaction between amino acids and reducing sugars that gives browned food its distinctive flavor. Slow cooking at a low temperature first ensures that the meat cooks evenly, minimizing the risk of an overcooked exterior and an undercooked interior. When the meat is nearly at its desired internal temperature, it’s then seared at high heat, which creates that crave-worthy crust.
The Key Benefits:
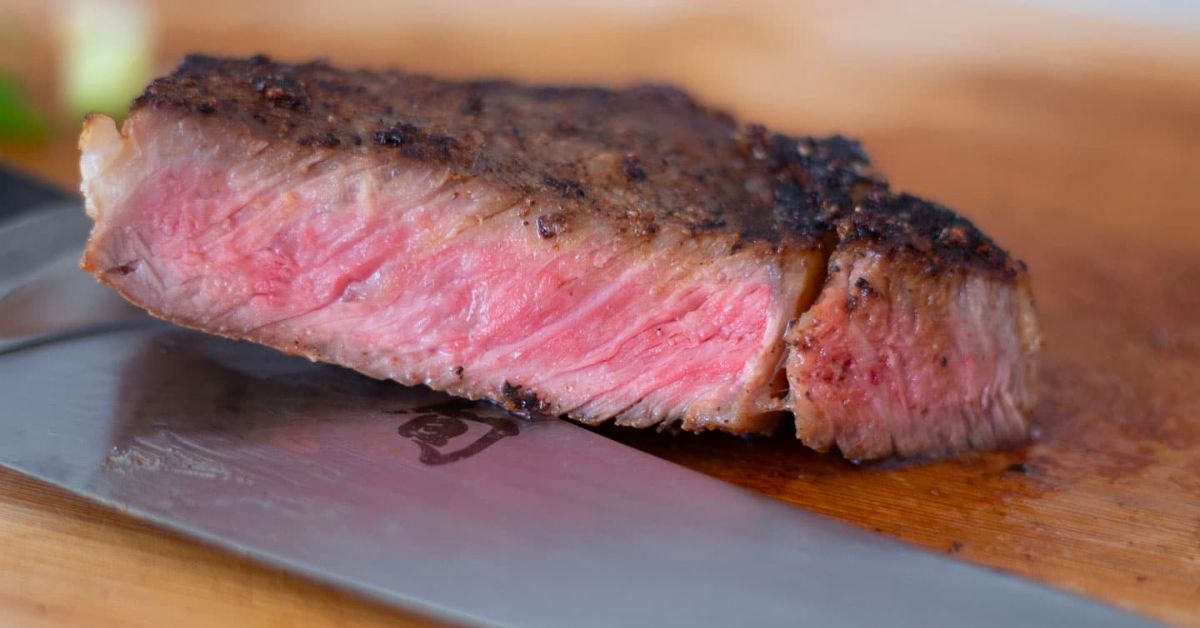
- Even Cooking: The low and slow approach ensures the meat cooks uniformly, providing a perfectly pink center from edge to edge.
- Superior Crust: Searing at the end allows for a better crust, thanks to the meat’s surface drying during the slow cooking phase.
- More Control: By slowly bringing the meat up to temperature, you reduce the risk of overshooting your desired doneness.
- Enhanced Flavor and Texture: The slow cook allows enzymes to break down the connective tissue, making the meat more tender and flavorful.
The Technique in Practice
Mastering reverse searing isn’t just about following steps; it’s about understanding the interaction between temperature, time, and texture. Here’s how to do it:
- Preheat your oven to between 200-275°F. This range ensures the meat cooks gently, allowing for even heat distribution.
- Season your meat liberally. This is your chance to add flavor; salt and pepper are classics, but feel free to experiment.
- Cook the steak on a wire rack over a baking sheet. This setup allows air to circulate around the meat, cooking it evenly and helping dry out the exterior.
- Rest your meat briefly after it reaches an internal temperature of about 100-115°F for a perfect medium-rare. Use a meat thermometer to nail this.
- Sear it off in a screaming hot pan or grill. This final step is where the magic happens, creating that delicious crust.
Tips for Perfect Reverse Searing
- Meat Thermometer Is a Must: Knowing the exact internal temperature is crucial for pulling the meat out at the right time.
- Let It Rest: A short rest before searing lets the meat’s juices redistribute, ensuring a juicier bite.
- High Heat for Searing: A hot pan ensures a quick sear and prevents the meat from cooking further internally.
🌡️ Temperature Guide for Steak Doneness
Understanding the desired internal temperatures for different levels of doneness ensures you always get the result you’re after. Here’s a quick guide:
| Doneness | Internal Temperature |
| Rare | 120-125°F |
| Medium Rare | 130-135°F |
| Medium | 140-145°F |
| Medium Well | 150-155°F |
| Well Done | 160°F and above |
Comparison of Cooking Methods
Comparing reverse searing to traditional methods highlights its advantages, particularly for thicker cuts:
| Method | Temperature Range | Time | Advantages |
| Traditional Sear | High (400-450°F) | Short (4-5 min/side) | Quick, develops crust |
| Reverse Sear | Low (200-275°F), then high | Long (15-25 min), then short (1 min/side) | Even cooking, better browning, more control |
Selecting the Right Meat
Not all cuts are created equal when it comes to reverse searing. Thick cuts, at least 1.5 inches thick, are ideal. This includes:
- Ribeye
- New York Strip
- Filet Mignon
- Porterhouse
- T-Bone
Thinner cuts don’t benefit as much from this method, as they can overcook easily during the sear.
What Is Reverse Searing Meat – Nutritional Information for a 8-oz Steak
A balanced diet includes understanding the nutritional content of what you’re eating. Here’s a breakdown for an 8-oz steak:
- Calories: 406
- Total Carbs: 1.3g
- Fiber: 0.3g
- Fat: 23g
- Protein: 49g
- Net Carbs: 1g
This information can help you fit a delicious steak into your dietary needs without overdoing it.
🥩 Table 1: Temperature Guidelines for Different Meats
To ensure perfect doneness, here’s a quick reference for internal temperatures for various meats:
| Meat Type | Rare | Medium Rare | Medium | Medium Well | Well Done |
| Beef Steak | 120 | 130 | 140 | 150 | 160 |
| Pork Chop | N/A | N/A | 145 | N/A | 160 |
Table 2: Reverse Sear vs Traditional Sear
Understanding the differences between reverse and traditional searing can help you choose the right method:
| Aspect | Reverse Sear | Traditional Sear |
| Cooking Time | Longer, but more control | Shorter, less control |
| Temperature Control | High precision | Lower precision |
| Suitable for | Thick cuts | Thin cuts |
| Outcome | Evenly cooked, juicy, great crust | Potentially uneven, less juicy |
Table 3: Nutritional Comparison of Different Meat Cuts
For those watching their diet, here’s how different cuts stack up nutritionally:
| Meat Cut | Calories | Total Fat | Protein | Carbs | Cholesterol |
| Ribeye | 640 | 48g | 58g | 0g | 137mg |
| Filet Mignon | 348 | 16g | 48g | 0g | 137mg |
Advanced Tips for Reverse Searing
- Dry Brining: Salt your steak a day in advance and leave it uncovered in the fridge. This draws moisture out, then reabsorbs it, seasoning the meat deeply and aiding in achieving a drier surface for the perfect sear.
- Room Temperature Resting: Before cooking, let your meat rest at room temperature for about 30 minutes. This step helps in more even cooking throughout.
- Pan Selection: A cast-iron skillet is ideal for searing because of its excellent heat retention and distribution, crucial for creating that perfect crust.
- Finishing Touches: After searing, consider adding butter, garlic, and fresh herbs to the pan, basting the steak for additional flavor.
Addressing Common Questions
- Can I Reverse Sear Thin Cuts? While best suited for cuts over 1.5 inches thick, thin cuts can benefit from a modified approach. Sear first for a short time, then finish in a low oven.
- How Do I Avoid Overcooking During Searing? Since the steak is nearly cooked to perfection before searing, keep the sear brief—just enough to develop the crust. This is typically 1-2 minutes per side.
- Can Reverse Searing Be Done on a Grill? Absolutely. Start with indirect low heat for the slow cook, then move to direct high heat for the final sear.
Selecting the Best Cuts for Reverse Searing
Not all steaks are created equal when it comes to reverse searing. Opt for cuts that are at least 1.5 inches thick to benefit most from this method. Prime candidates include:
- Ribeye: Marbled with fat, it’s ideal for juicy, flavorful results.
- New York Strip: Leaner than ribeye but still tender and flavorful.
- Filet Mignon: Though lean, its thickness makes it perfect for even cooking.
The Right Tools for the Job
Investing in the right kitchen tools can elevate your reverse searing game. Here’s what you’ll need:
- Meat Thermometer: A must-have for nailing the perfect doneness.
- Cast Iron Skillet: For achieving a perfectly seared crust.
- Wire Rack and Baking Sheet: Allows air to circulate around the meat for even cooking.
🥘 Table: Essential Tools for Reverse Searing
| Tool | Purpose | Recommendation |
| Meat Thermometer | Ensure meat is perfectly cooked | Thermoworks Thermapen Mk9 |
| Cast Iron Skillet | Achieve a perfect sear | Lodge Classic Cast Iron Skillet |
| Wire Rack & Baking Sheet | Even cooking in the oven | Nordic Ware Natural Aluminum |
Techniques for Different Doneness Levels
Achieving your preferred level of doneness is crucial for the perfect steak. Use the following internal temperatures as a guide, remembering to pull the meat about 5°F before the target temp, as it will continue to rise during resting:
- Rare: 120-125°F
- Medium Rare: 130-135°F
- Medium: 140-145°F
- Medium Well: 150-155°F
- Well Done: 160°F and above
Addressing Health Concerns
Cooking meat at high temperatures can lead to the formation of harmful compounds like heterocyclic amines (HCAs) and polycyclic aromatic hydrocarbons (PAHs). Reverse searing, by using lower temperatures for the majority of the cooking process, may reduce the formation of these compounds, potentially making it a healthier cooking method.
The Versatility of Reverse Searing
Reverse searing isn’t just for beef. Try it with:
- Pork Chops: Thick-cut chops benefit greatly from this method.
- Lamb Chops: Achieve a tender interior with a crisp exterior.
- Game Meats: Venison and elk steaks can be cooked perfectly using reverse searing.
Selecting the Right Cuts
- Thick cuts of meat (at least 1.5 to 2 inches) are ideal for reverse searing. This includes ribeye, porterhouse, T-bone, and thick-cut pork chops or fish fillets.
- Look for well-marbled cuts when selecting beef. The fat within the muscle adds flavor and juiciness that enhances the reverse searing results.
- For pork, choose cuts that are not too lean to avoid dryness. The reverse sear can help retain moisture, but starting with a slightly fattier cut can make a significant difference.
Meat Quality Matters
- Grass-Fed vs. Grain-Fed Beef: Grass-fed beef tends to be leaner, which can affect how it responds to slow cooking. It might require more attention to avoid overcooking during the sear.
- Fresh vs. Frozen: While fresh meat is generally preferred for its texture and flavor, frozen meat can also yield excellent results with the reverse sear method if properly thawed.
- Aging: Aged beef is known for its depth of flavor and tenderness, making it an excellent candidate for reverse searing. Both dry-aged and wet-aged steaks will benefit from this cooking method.
Temperature and Timing Guide
🌡️ Table 5: Reverse Sear Temperature Guide
| Meat Type | Slow-Cook Temp | Final Sear Temp | Target Internal Temp |
| Beef Steak | 225°F to 275°F | 500°F to 550°F | 120°F (Rare) to 135°F (Medium) |
| Pork Chops | 225°F to 275°F | 500°F to 550°F | 145°F (Medium) |
| Fish Fillets | 200°F to 250°F | 450°F to 500°F | 130°F (Medium) |
- Note: These temperatures are starting points. Adjust based on your oven’s specific characteristics and your personal preference.
Cooking Tips
- Preheating is Key: Ensure your oven, smoker, or grill is properly preheated before adding your meat. This stabilizes cooking temperatures and helps achieve consistent results.
- Resting Meat: Although reverse-seared meat requires less resting than traditionally cooked meats, a brief rest after the sear can help juices redistribute, enhancing flavor and juiciness.
- Searing Technique: For the best sear, ensure your pan is extremely hot before adding the meat. Use just enough oil to coat the bottom of the pan, and don’t crowd the pan – cook one or two pieces at a time.
Final Thoughts on Reverse Searing
Reverse searing meat is more than just a cooking method; it’s a pathway to culinary excellence, allowing home cooks and chefs alike to achieve steakhouse-quality results in their own kitchens. With its emphasis on precision, control, and patience, reverse searing turns cooking into an art form, ensuring every bite is as delicious as it is perfectly cooked.
Conclusion- What Is Reverse Searing Meat?
Reverse searing meat revolutionizes how we cook thick cuts, offering a foolproof path to evenly cooked, tender, and flavor-packed meals. By understanding the science, mastering the technique, and utilizing the right tools, achieving steakhouse-quality results at home becomes not just possible but predictable. This method proves that with the right approach, cooking steak to perfection isn’t a challenge; it’s a guarantee.